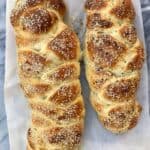
Challah Bread
Adapted from Beth Hensperger's cookbook Bread.
Servings: 2 loaves
Ingredients
- 2 packages (4 ½ teaspoons) Active Dry Yeast
- 5 ¾ to 6 cups bread or all purpose flour, divided
- 1 Tablespoon salt
- ½ cup sugar
- 1 ¾ cups hot, not boiling, water
- 1 stick unsalted butter, melted
- 4 large eggs, slightly beaten with a fork
Rich Egg Glaze
- 1 egg
- 1 Tablespoon water
- Poppy seeds or sesame seeds
Instructions
- In the bowl of a standing mixer, (or if using a hand mixer, place in a large standard mixing bowl) place the yeast, 2 cups of flour, salt and sugar.
- Using the whisk attachment, whisk to combine.
- Slowly add the hot water, melted butter and lightly beaten eggs.
- Beat vigorously being sure to incorporate all dry ingredients that may still be at the bottom.
- With the mixer still running, slowly add the remaining flour, in ½ cup portions. When the dough becomes stiff, or has "clogged" up the whisk (usually after 3-3-½ cups), switch to the dough hook attachment. If using a hand mixer you may want to switch to a wooden spoon or your firmest rubber spatula.
- Stop machine from time to time to gather up dry dough that clings to the sides of the bowl. Continue to mix.
- When all ingredients have been fully incorporated, transfer dough onto a lightly floured surface (I use a large cutting board or work directly on the countertop.)
- Before your hands get all gooey and doughy, pour a small amount of oil, about 1 to 1 ½ Tablespoons) into the bowl (no need to clean it first!) and with a paper towel, oil the entire inside surface of the bowl.
- Knead dough on the floured surface for about 5 minutes or so until you see small airy blisters (not a lot) under a layer of dough. I usually stop once I see the first 1 or 2...depending on if I worked out enough that day! ;) Don't clean up your floured surface! You'll need it one more time!
- Keeping in ball shape, place dough into oiled bowl and turn once to also coat the top.
- Cover loosely with plastic wrap. (If you keep the plastic bags you put your produce in at the market, they fit perfectly over a KitchenAid standard size bowl!)
- Place in a warm, draft free area and let rest and rise until risen above the rim or doubled in size, about 1 hour (1 ½ hours max).
- Meanwhile, line a cookie sheet with parchment or foil.
- Gently "dump" dough onto lightly floured surface.
- With one hand, press lightly down on dough to slightly deflate.
- Use a non-serrated large knife (butcher style) or pastry scraper, to cut the dough evenly in half.
- Divide one of the halves into 3 pieces.
- Roll each piece into a long skinny rope, equal in length. Lay each of the 3 pieces side by side. Braid the 3 ropes into a basic braid. Tuck the ends underneath. Go back to the top and tuck those underneath as well.
- Transfer braid onto prepared cookie sheet, leaving room next to it for the other loaf.
- Repeat the braiding process for the 2nd loaf.
- Cover loosely with plastic wrap. I actually use the same pieces from earlier, except I flip it over because of the moisture from the condensation when it rose in the bowl. You don't want wet dough!
- (At this point if you are making the bread ahead of time, see "Gr8 tips" below.)Or continue:
- Let rest for ½ hour in a draft free area. No need to make sure they double in size. Because of the 4 eggs, the loaves will double plenty while baking.
Bake the Bread
- Preheat oven to 350 degrees.
- While oven is preheating, prepare rich egg glaze.
- Whisk to combine egg and water.
- Brush glaze over tops of loaves.
- Sprinkle with either sesame or poppy seeds.
- Bake for 20-25 minutes until they are a beautiful golden brown.
- I often check ½ way through the baking time to make sure loaves are baking evenly. Sometimes the back of the oven tends to get hotter and you want the loaves to look evenly golden, shiny and gorgeous!
- Transfer the loaves to wire racks to cool. Sitting on the cookie sheet to cool causes dampness under the loaves.
Notes
A Gr8 Do Ahead Tip:
If you'd like to make the bread hours, or up to a day ahead, you can complete the recipe up to the Step #21 (before the 2nd rise in braid form).- Place loosely covered loaves still on cookie sheet in the refrigerator to slow rise over night, or several hours.
- When ready to bake, remove from refrigerator and let dough sit for about 15 minutes.
- Then continue with with the instructions: Bake the Bread
A Gr8 Gift Idea:
At Step #16, divide the dough into 4 pieces, then 12 ropes and make 4 smaller loaves. Wrap in parchment paper and secure with twine. These are great for gifting!Another Gr8 Tip:
This bread makes delicious French toast, IF you should have any leftovers! Tried this recipe?Mention @Great8Friends or tag #gr8food!